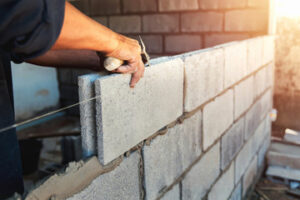
Cabinet Painting – How to Get the Best Out of Your DIY Project

Cabinet Painting Sacramento is a great way to upgrade the look of your kitchen. But it isn’t always easy. Many DIY projects go awry, and amateur work often has subpar results. Professional services offer consistent outcomes and can help you add value to your home.

Cabinet Painting

For cabinet paints, choose a high-quality oil-based alkyd or water-based latex that’s moisture and stain-resistant. You’ll also want to use a deglosser and sand between coats for smooth finishes.

Before any coating can be applied, the surface must be properly prepared. This step ensures that the new coat will adhere and provide a durable finish. It is very common for homeowners to attempt this project themselves, but it takes years of practice to be able to achieve a professional quality finish that will last for many years. In fact, about 20-25% of calls received by professional industrial coatings companies are for problems related to poor surface preparation.

The surface must be cleaned and degreased using a solvent such as acetone, methyl ethyl ketone, or d-limonene. It must also be sanded or ground to create an even surface and roughen it slightly, which helps the primer and paint adhere. This is done by hand or using power tools, such as a handheld or walk-behind grinder with a variety of grinding discs. This is the most time consuming part of the process, but is necessary to ensure that all areas are free of contaminants and are smooth.

A final step in this preparation is sanding with a range of grits from 100-150 grit, followed by a light scrubbing with a degreaser or cleaner to remove all the dirt that has been loosened by the sanding. All areas should then be wiped down with a damp rag or cloth to remove any remaining dust.

After all surfaces are clean and sanded, they should be primed with a commercial oil-based primer. This undercoat is vital to the longevity of the cabinet painting job, as it provides a strong bond to the existing coatings and seals in any stain or polyurethane finish. A good quality primer will also help to protect the wood and reduce future moisture stains.

It is important that the surface is allowed to dry thoroughly before painting. Moisture trapped under wet coatings can cause flash corrosion. This is a very severe problem that can affect the integrity of the coating and could lead to holes in the finished product. Several factors influence the drying time of coatings, including environmental conditions and temperature.

Primer

Painting cabinet doors and drawers is a significant home improvement project that can have a big impact on your kitchen. It can also raise your home value significantly if done well. The key to getting a beautiful, long-lasting finish is good surface prep and proper priming. If you skip this step, your paint job may fail within a year or two, leaving your kitchen cabinets looking worse than they did when they were originally painted.

Cabinets see a lot of wear and tear, from opening and closing, spills, and moisture changes. This can lead to dings and scratches. Even if you sand the cabinet surfaces to smooth them, there is still likely to be some minor surface damage. Primer fills in these small imperfections, creating a smooth base for your final coat of paint.

The best primer for painting cabinets is an oil-based product that dries hard and prevents stains from bleeding through the new paint. We use KILZ 3 premium primer for its adhesion and mildew-resistance, both important in a damp area like the kitchen.

Before you apply the primer, you must clean the cabinet surfaces thoroughly to remove dirt and grease. Grease and oils will seep through a topcoat of paint, causing it to peel, chip, or crack early. We usually use degreasers such as trisodium phosphate (TSP) or liquid deglosser to make the surfaces clean and ready for priming.

After the cabinet surfaces are dry, sand them lightly with medium-grit sandpaper. This is especially necessary for the areas above the stove and sink, which tend to have the most grease on them. If you have a power sander, this is much faster and more effective than sanding manually.

Once you’ve sanded the surfaces, vacuum them to remove any dust and wipe them down with a damp cloth to be sure they are clean and debris-free. Then, let the primer dry completely for 24 hours. When the primer is completely dry, sand it again with very fine grit sandpaper. This will smooth the surfaces so your next coat of paint goes on smoothly.

Paint

Cabinet painting is not the same as wall paint, and it takes a lot of practice to get right. It is one of the most challenging DIY projects homeowners can undertake. This is why it is a good idea to hire a professional.

It’s important to choose the right color and finish for your cabinets, as this will have a big impact on their appearance. There are several options available, including flat, eggshell, semi-gloss, and gloss. Each has its own advantages and disadvantages, so it’s best to consult an expert before deciding.

Another factor to consider is the type of paint used. It’s essential to use a high-quality oil-based or alkyd paint. These are more durable than regular wall paints and will last much longer. You’ll want to avoid water-based paints, as they are more likely to smudge and yellow over time.

Choosing the right primer is also crucial. You’ll need a quality Cabinets primer, and it should be tinted to match your desired color. We recommend a Zinsser all-surface primer. Cabinets primer is thicker than wall paint, and it can take a while to dry. It’s worth the wait, though, as it will help your paint job last longer.

After priming, you can begin painting! It’s a good idea to apply at least two coats of paint. This will help protect your cabinets and make them look better. Ensure that the first coat dries completely before applying the second. It’s also a good idea to wait at least two weeks between coats.

When you’re done, you can reinstall your cabinet doors and drawers. If you removed the hardware, be sure to label it so that you can reattach it correctly. It’s a great feeling to see your new cabinet paint come to life!

Painting your cabinets can be a challenging project, but it’s definitely worth the effort. It can have a huge impact on your kitchen’s look and feel, and it’s a great way to add value to your home. However, it’s important to remember that a bad paint job can make your kitchen look worse than it did before.

Finish

Once the cabinet painting is complete, it’s time to add a protective finish. A polyurethane is a good choice, as it will keep the paint from chipping and staining over time. There are many options to choose from, but we recommend a **water-based** polyurethane specifically formulated for painted surfaces. It dries clear and won’t yellow over time. Look for a spray option or use a synthetic brush or foam roller for an ultra-smooth finish.

For a quick upgrade to your kitchen, you can also replace the hardware. This small change can make a big impact on the overall look of your kitchen. To create a cohesive look, you can match the color of the new hardware with your newly-painted cabinets.

When choosing a paint, look for a product designed to meet the challenges of the kitchen environment. N-Hance primers, paints and topcoats are formulated to resist damage from cooking oils, grease, moisture and high heat to ensure that your finish holds up over time.

Before you begin the cabinet painting process, you should thoroughly clean the surfaces. Especially those located above the stove or sink, as these can accumulate the most dirt and debris. If your surface is particularly dirty, you may need to strip the old paint to scuff it up and prepare for a smooth coat of primer and paint. Stripping is a messy and time-consuming task, so we recommend trying to avoid it as much as possible.

Then, sand the entire surface with medium grit sandpaper and a palm sander. This will remove any glossy lacquer that is on the surface, and it will also help to ensure a smooth finish when you paint. If you prefer not to strip, you can also use a deglosser or liquid deglosser to clean the surface and get it ready for primer and paint.

After all of the surfaces have been cleaned and sanded, you can begin the painting process. Use a roller for the majority of the surfaces, and use a smaller brush for the corners and other hard-to-reach areas. Be sure to apply even coats of paint and let the previous layer dry completely before applying another. It’s also important to overlap the edges of your paint coats before they dry, to prevent lines and lap marks.

The Basics of Pest Control

Pest Control involves removing unwanted plants and animals that threaten health, safety and property. Integrated Pest Management (IPM) methods minimize the need for pesticides.

Pest Control

IPM begins with determining the level of damage at which action is needed, called a threshold. Next, preventive nonchemical practices are used to keep pest populations below the threshold. Click Here for more details.

Pest infestations are costly, pose health risks, and disrupt a comfortable living or working environment. They may also damage your property and contaminate food supplies. Preventative pest control measures offer numerous benefits, including substantial cost savings, improved health and safety for occupants by reducing exposure to allergens and diseases carried by pests, and valuable peace of mind.

Regular inspections of your property by a professional pest control technician enable you to detect potential problems before they escalate into full-blown infestations. They will check common entry points and areas of vulnerability, as well as conditions that attract pests such as moisture, food, or shelter. They will also address factors that discourage pests from thriving, such as sealing cracks and removing potential food sources.

Sanitation: Proper sanitation practices such as efficient waste management and careful food storage reduce attractants for pests. Keeping garbage bins tightly sealed and removing overgrown vegetation around your home can eliminate pest pathways, while washing linens regularly in hot water can kill bed bugs and other pests. Using dehumidifiers in damp areas helps to create a less conducive environment for pests, as can maintaining clean surroundings.

Exclusion: Sealing cracks and gaps prevents pests from entering your home or business. This is especially important for windows, doors, and utility openings. This can be accomplished by caulking and installing weather stripping. For outdoor spaces, repairing leaking pipes, eliminating standing water, and removing overhanging branches can be effective in preventing pests from nesting.

Habitat Modification: Removing or modifying habitats where pests thrive can help to deter them from invading your space. This includes reducing clutter and food residues on surfaces, and cleaning less obvious areas like under appliances and in the corners of rooms. Removing weeds and trimming shrubs can make your yard less attractive to rodents, while keeping water-retaining soil moist is vital for minimizing mosquito populations.

Understanding pests’ lifespans and life cycles is also an essential element of preventive pest control. Knowledge of the life cycle stages of pests, such as egg, larva, nymph, and adult, enables you to target intervention strategies at specific pest life stages, when they are most vulnerable.

Detection

Monitoring pests helps to ensure that a pest problem does not reach unacceptable levels and to evaluate the success of control measures. Monitoring can be done manually by scouting or trapping for insect, insect-like, and mollusk pests; weed pests are often monitored by visual inspection; vertebrate pests are typically monitored by tracking the damage they cause; and microbial pests are monitored by counting the number of damaged plants or monitoring disease symptoms.

Pests can damage crops and reduce harvest amounts, or they may contaminate food products or threaten human health. They can also carry diseases that affect humans, causing illness or making existing conditions worse. For example, rodents can contaminate food with their faeces and urine; birds such as seagulls and pigeons carry Salmonella and E. coli; and insects can contaminate medical equipment or cause infections in hospital operating rooms.

In order to monitor pest populations effectively, you must be able to accurately identify the type of pest you are dealing with. This is especially important in the case of invasive species, which can have severe economic and ecological impacts if they become established.

Detecting a new pest invasion is critical because the eradication of an invasive species is very difficult and expensive. Newly established pests can damage agriculture, natural resources, and the environment, reducing crop yields, increasing pesticide use, and threatening human health and quality of life.

To reduce the risk of pests becoming established in our county, we rely on a combination of prevention methods such as pest exclusion and detection trapping. These are based on the principle that it is much easier to prevent a pest from entering an area than to eradicate it once it has already established itself.

The most successful invasive pest interceptions are the result of partnerships with local residents and community organizations, who are willing to host detection traps on their property. These are usually baited with food or attractants such as specific pheromones, which can be used to lure the target pest and trigger its capture.

In addition to utilizing detection traps, it is important to perform routine pest inspections of buildings, landscaped areas, and other infrastructure. These inspections are important for identifying potential pest harborage areas, maintenance needs, sanitation deficiencies, and other factors that can lead to the establishment of a pest infestation. When conducting a pest inspection, it is recommended to use a flashlight and a magnifying glass to locate hard-to-reach places where pests hide, such as behind or beneath furniture.

Treatment

Once the pests have been identified, the technician will create a treatment plan for them. During this process, the technician will evaluate multiple factors, including the size of your property and the severity of the infestation. They will also consider whether any areas were not adequately treated during the previous service visit, and they will make adjustments accordingly.

During this step, the technician will use a variety of techniques to kill and repel the targeted pests. This could include spraying, baits, dusting, or trapping. In more severe cases, they may recommend fumigation.

The purpose of this step is to ensure that the pests are fully eliminated from your home and property. Once this is accomplished, the technicians will typically schedule a follow-up appointment to monitor the results. During this time, the technician will inspect the property for any lingering pest activity, as well as any new potential threats. They will also offer guidance on preventive measures, offering tips and advice on practices or modifications that will keep pests away from your library collection in the future.

In many cases, eradication is impossible, and the next best thing is to prevent the pests from re-entering the property. For this reason, the technician will provide recommendations for keeping pests out of the library collection through routine inspections and blocking any entry points into the building. This will include sealing any gaps and cracks, and recommending changes in landscaping to block the entrance of pests like termites and rodents.

It’s important to note that even when the goal is prevention, some pests cannot be tolerated at all. For example, rodents can contaminate food through their droppings, and birds can spread disease through their feathers or dander. These types of pests can also damage crops, devalue buildings and lawns, and irritate people with allergies or asthma. Ultimately, the decision to tolerate a pest or not depends on how significant of a threat it poses to your property and health. The bottom line is that you should never compromise your health and safety. Always act as quickly as possible when it comes to pest control!

Prevention

In many cases, pest infestations can be prevented with simple maintenance and sanitation measures. A good pest control plan starts with inspection and identifies conditions that make an area suitable for pest activity. The inspection includes identifying and locating food, water, shelter, and nest areas. The plan then recommends sanitary practices, exclusion methods (like traps and barriers), and treatments, whether chemical or non-chemical, to prevent pests from occurring.

Pests are organisms that damage or devalue crops, gardens, lawns, homes, and businesses. They can also transmit diseases to people and pets, as well as negatively impact terrestrial and aquatic ecosystems. Pests may be insects, fungi, bacteria, rodents, or vertebrates.

Prevention is the best approach to pest management, as it reduces the need for more intensive and hazardous treatments. This is the primary goal of integrated pest management, where prevention is prioritized over detection and treatment. Pest control methods that are effective include physical, cultural, biological, and chemical controls.

Physical controls can be anything from knocking a pest off plants with a spray of water, to using a rake or hoe to clear away fallen debris and infested leaves, to setting traps or barriers. Cultural controls include improving sanitation and removing debris, promoting soil health by fertilizing properly, and growing resistant species that are less attractive to pests. Biological controls use natural enemies or parasites to injure or consume pest populations. Chemical controls can be a last resort, and can involve targeted or broad-spectrum chemicals that kill only the target pest without harming beneficial insects and pollinators.

A combination of preventive approaches can greatly reduce the need for treatments and increase the effectiveness of those that are needed. Educating yourself about pests, their habits, and ideal habitats can empower you to take action. Keeping trash cans and other containers tightly sealed, removing clutter, maintaining landscapes by trimming trees, and sealing cracks in foundations or walls all help to make an environment less conducive to pests. Keeping water sources like leaking pipes or sprinklers in working condition can also be helpful, as pests are drawn to moisture.

What Is Landscaping?

Landscapers use a wide range of skills and tools to manipulate nature to achieve aesthetic and practical goals. Landscaping includes everything from lawn care to designing and installing gardens, parks and other public spaces.

Landscaping

To create your dream garden, begin with a site analysis. Walk around your yard, taking note of what you like and don’t like. Make a list of your needs and desires, and draw bubble diagrams in the spaces you wish to change. Visit https://www.primecutlawnky.com/ to learn more.

Landscape design involves shaping outdoor areas to make them more appealing and functional. This can include adding plants, creating walkways, and even installing water elements. Landscape designers use their knowledge of horticulture, soil science, architecture, and art to create unique outdoor spaces. They balance site visits, client meetings, and presentations with researching, drafting plans, and overseeing the construction process.

Color, line, form, and texture are all important elements in landscaping. Color is the most obvious element, and it can be used in a variety of ways to draw attention to a certain area or feature. For example, using a combination of warm and cool colors in the same flower arrangement can add contrast and visual interest. Form refers to the shape and structure of plant parts, from the stiffly upright branches of Lombardy poplar trees to the drooping quality of weeping willows. Texture is the feel or roughness of a surface, and landscapers often use different textures to create interest.

Form is the arrangement of plant parts to create a balanced whole. This can be achieved with symmetry or asymmetry. Symmetrical balance has an obvious axis with equal parts on each side. Asymmetrical balance is more informal, and it can be created by arranging different types of plants or structures in groups on either side of a less-obvious axis.

Another aspect of form is scale. Scale is the size relationship between different parts of the landscape, such as buildings and plants. A landscape that is out of scale can look awkward and unfinished. To avoid this, landscapers must account for the mature height and spread of plants when planning a space.

Landscapers also consider the effect of a landscape on the surrounding environment. For example, they may choose plants that are drought-tolerant to reduce water usage. They may also choose species that have natural resistance to pests to minimize the need for chemical treatment.

Regenerative landscape design (RLD) is an approach to landscape that promotes human health and well-being by integrating social and ecological systems. RLD includes a focus on co-design, which encourages collaboration between stakeholders to identify and address complex environmental issues.

Plant Selection

Plant selection is one of the most important parts of landscape design. It affects how quickly your greenery grows, how long it lasts, and how easy it is to maintain. It’s also important to consider how your plants will complement other features in your garden, such as patios, pathways, and decorative stone elements.

The best way to determine which plant types will thrive in your yard is to look at the climate and soil conditions of your area. Every region has a unique micro-climate, and selecting the right plants for your climate will ensure healthy growth and reduce maintenance requirements. It’s also important to consider your soil quality and whether it’s prone to certain diseases, such as nematodes and Texas root rot.

When choosing shrubs, flowers, or trees, you’ll want to choose botanical species that attract pollinators and provide food for native wildlife. This will contribute to the biodiversity of your neighborhood and help keep local ecosystems healthy. Native plants are also often the best choice, since they’ve co-evolved with your environment and can better adapt to climatic changes.

Form and color are other important factors to consider when selecting vegetation. Plants with different shapes add depth to your garden and are more visually appealing. You’ll also want to think about the color of leaves, fruit, or bark to add interest to your landscape. Deciduous plants tend to change form with the seasons, while evergreens maintain a consistent shape throughout the year.

You should also consider how much sunlight your property receives on a daily basis and what areas are shaded by buildings or existing trees. This information will help you determine how much sun or shade your plants require and the amount of light and moisture they can tolerate. It’s also important to know if your soil is susceptible to disease, as this will limit your choices of plants.

Finally, it’s important to decide if you’d like to have a formal or natural landscape. For example, you may want to include trimmed hedges and a well-groomed garden for a more manicured look, while a more natural landscape can be made up of wildflowers and vines on trellises.

Hardscaping

Although often used interchangeably, landscaping and hardscaping are two different things. Landscaping uses natural flora to add beauty and functionality to outdoor spaces, while hardscaping utilizes non-living materials like stone and concrete to enhance the design of a garden or lawn area.

Examples of hardscaping include fences, walkways, patios and retaining walls. It can also incorporate water features, fire pits, decks, garden beds and outdoor lighting.

While hardscaping is less environmentally friendly than softscaping, it does have some benefits. For example, paving stones help to reduce erosion and maintain soil structure, which prevents weed growth and provides support for plants. It also helps to conserve water by reducing the amount of irrigated grass. Another benefit is that it can create shade in hot climates, allowing homeowners to enjoy their gardens even in the heat of summer.

The environmental impact of hardscaping depends on the materials used and how they are installed. For example, a paved surface made of flagstones can be more eco-friendly than a standard turf lawn because it requires much less watering and upkeep. It is also possible to install a gravel path or garden bed that will reduce the amount of fertilizer and pesticides used in the yard.

In addition, choosing a green hardscape design is important. For example, if you are using pavers, look for those with a high solar reflectivity index (SRI). These are designed to minimize the absorption of sunlight and will not become too hot underfoot during the day. Other options include using wood that has been reclaimed or purchasing from a company that uses recycled materials in their products.

The primary purpose of hardscaping is to provide functional and attractive areas for outdoor activities such as walking, entertaining or relaxing. It can increase the aesthetics and value of a property, as well as make it easier for people with mobility challenges to move around outdoors. For example, a flat paved stone patio is much more useful than a lumpy patch of grass and can make it safer for children and elderly visitors to navigate the grounds.

Lighting

Lighting accentuates outdoor design elements, elevates walkway visibility, and sets a tone for your property. Landscape lights illuminate sidewalks for safety at night, but they also create ambiance and elevate other features like fountains, waterfalls, ponds, and more.

The best lighting plans logically connect different areas of the yard with paths, stepping stones, lawn, repetition and alternation of plants or colors, and light. This provides rhythm and structure to the garden and guides visitors from front to back.

Hinkley landscape lighting comes in a variety of styles and sizes. Whether it’s accent, path or spread or post and bollard landscape lighting, they have products that will fit your needs. Often, these landscape lights come on a transformer and require a licensed electrician to play with line voltage.

Why Window Replacement Is a Cost-Effective Upgrade

Window Replacement Ellicott City, MD is one of the most cost-effective upgrades homeowners can make to their homes. And, when done right, it also adds significant resale value.

Window Replacement

Visible signs of damage like rot, soft frames, or leaking hardware indicate it’s time for replacement. Ignoring these issues increases energy costs and creates security risks.

Damaged windows can cause drafts, increase energy costs and be a security risk. In some cases replacing the window may be the better option, but in most scenarios a repair is the way to go.

A damaged window can mean anything from a cracked glass pane to a shattered frame or even just a ding in the wood. Cracks, chips and dents are easy enough to repair with the help of a handyman or glazier.

Windows that have suffered significant damage or are showing signs of wear and tear should probably be replaced, as ignoring such problems can lead to more extensive repairs down the road. Window replacement can address the rattling of the windows, ease of opening and closing and energy efficiency as well as rot in the frame, water leaks around the window and more.

Old windows that are painted and in good condition can often be repaired. Minor chips in paint are easy to touch up, and wood rot is generally an easy fix as long as the wood is not too dry and you use a quality wood filler.

If your wood has serious rot, however, it will be costly to repair. Replacing rotten sills, frames or muntins can be expensive, and in some cases a full replacement is the only option.

Aesthetics are another consideration, especially for older homes and historic districts. While new windows offer many advantages over old ones, they do not always match the subtle design details of older buildings. In addition, new windows may not be as energy-efficient as original windows.

Restoring your old windows is a great way to maintain the history of your home while enjoying its beauty and function. However, homeowners should be prepared for a commitment to regular maintenance. Restored windows will need to be repainted or refinished regularly, and old glass can be difficult to repair or replace. Energy-efficient features, such as double or triple-pane glass with low-E coatings, are available for modern replacements that can improve comfort and reduce utility bills without compromising the aesthetic of your home.

Water Infiltration

Water infiltration is one of the most serious problems caused by poor window installation. It’s not only detrimental to the appearance of your home, but it also weakens its inner structure and increases your energy bills.

It also creates a humid environment that is perfect for the growth of mold and mildew. This is a serious health hazard for your family. Besides, it can degrade the quality of your windows, causing them to lose their functionality and efficiency.

The best way to protect your windows from water damage is to install new ones with a tight seal. You can achieve this by replacing the old weatherstripping with a high-quality alternative. You should also consider a flood-resistant frame for future storms.

Another sign of a leaky window is sagging frames or paint that’s bubbling and peeling. This is a result of extended moisture exposure, which can cause wood fibers to break down. Moisture in your windows can also cause rot, which damages the structure of your home and requires replacement.

A clogged drainage system is another common source of window leaks. This occurs when the drainage channels are blocked or not designed to handle heavy rainfall. Over time, this can cause the window to sag and deteriorate, leaving it vulnerable to air and water infiltration.

Water leaks also create an ideal environment for fungi and bacteria to grow in your house, which can lead to serious health issues. It’s important to get the leaks fixed as soon as possible.

Lastly, leaking windows create drafts that can affect your home’s energy efficiency and insulating capabilities. It can cause the cool air to stay inside during summer and the warm air to escape during winter, leading to higher energy bills.

Lastly, you should also watch out for signs of excessive condensation around your windows. Excessive condensation is a sign of an impending window leak and can be addressed by using a waterproof sealant. You can find this type of product at most hardware stores and follow the instructions on the package. In addition, you can replace your old insulation with a new and improved version to increase the insulating properties of your home.

Energy Efficiency

Energy efficiency has become a prominent concern in window design, and homeowners are rightly concerned about how their windows impact home heating and cooling costs. The good news is that modern replacement windows have a range of features that maximize energy efficiency.

Efficient windows reduce energy consumption by minimizing heat transfer between indoor and outdoor environments. This reduces the load on your heating and cooling system, resulting in lower utility bills and enhanced comfort throughout the year.

In addition, effective window replacements are insulated to prevent air leakage, which is one of the biggest causes of high energy bills. Additionally, many new windows feature low-emissivity coatings that reflect a portion of the sun’s harmful ultraviolet (UV) rays. This helps to protect carpets, paintings, wood, and other valuable furnishings from fading and discoloration.

When shopping for efficient replacement windows, look for the ENERGY STAR® label. This will provide you with a variety of information about the window’s performance, including its solar heat gain coefficient (SGHC), UV percentage, and infrared percentage. The SGHC measures how much solar heat comes through the window, while the UV and infrared percentages indicate how well the window blocks those rays.

Also, consider the number of glass panes in your new replacement windows. Double-pane windows offer superior insulation than single-pane windows. The spacer, or bar, that separates the panes also plays a big role in the window’s energy efficiency. At Infinity, we use a patented stainless steel spacer that has the lowest seal failure rate in the industry.

It is important to remember that while energy-efficient windows have a higher upfront cost, they pay for themselves in lower energy bills. Additionally, replacing your old windows with energy-efficient models will help to reduce the demand for nonrenewable fuels and greenhouse gases that harm the environment. When it comes to reducing your carbon footprint, few improvements can be as easy and affordable as upgrading to energy-efficient windows.

Aesthetics

Whether your windows are worn-out or simply outdated, replacements offer a way to refresh your home’s aesthetic. The right design complements your architectural style and resonates with your personal taste. If you’re unsure which options will best suit your home, talk with a professional. An experienced window and door specialist can provide you with detailed information on the styles that coordinate well with specific decor styles, as well as the window and frame’s durability and energy efficiency ratings.

Window replacement can also be a great opportunity to upgrade your window frame material. Wood windows offer classic aesthetics that complement both traditional and contemporary homes, while vinyl frames offer sleek lines for a modern look. Additionally, many replacement windows are available in specialty shapes like circles, full circle, octagon, transom, and palladium to fit unique spaces.

Another important consideration is the window’s operation and how easy it is to open and close. This is especially important if you live in an area with extreme weather conditions. If you have trouble opening or closing your windows, it could indicate that the components are wearing out or a problem with the natural settling of your home.

Finally, you may want to consider the insulating performance of your new windows. Older windows don’t always do a good job of keeping hot air out in the summer and cold air in during the winter, which can increase your energy costs over time. However, new replacement windows often include features like Low-E glass and argon between panes that help regulate indoor temperature and reduce your energy costs.

Window replacement is not a do-it-yourself project. It’s important to work with a professional installer who can ensure that your new windows are properly installed, sealed, and caulked, which prevents water leaks and air infiltration, and improves the function and aesthetics of your home. A professional will also be able to recommend the best type of window for your home, including options that enhance your home’s curb appeal while remaining durable and functional.

Concrete Floor Polishing

Concrete Floor Polishing Orange County is a process that involves grinding and chemically densifying your existing concrete floor. This eliminates concrete porosity, which reduces abrasion and staining.

Concrete Floor

The final step involves applying a high-gloss sealant to the concrete. This creates a smooth surface free of the nooks and crannies where dust typically clings.

Preparing concrete floors for polishing is a time intensive process. It involves removing any existing flooring, scrubbing the concrete surface to remove dirt, oil and grease, using degreasers when necessary and thoroughly cleaning and rinsing the floor. Ensuring that the floor is level and filling any cracks before starting polishing is also important.

Then crews will grind the concrete with metal-bonded diamond abrasives in a variety of grits until the desired sheen is achieved. A well trained crew will know when to switch to a finer grit to achieve the best results.

This process can be a bit messy, and it’s important that crew members wear appropriate safety gear including masks, gloves and eye protection to avoid the dust and debris. It’s also crucial that crews are familiar with the equipment they are using and understand how it works to properly use it.

Concrete floors that are polished require less maintenance than other types of flooring, reducing costs for materials and labor over the course of a floor’s life-span. With proper cleaning and routine care, a polished concrete floor can last for decades.

A polished concrete floor offers limitless design opportunities, allowing you to create the perfect space for your business or home. Stains, dyes and aggregates can be mixed or layered for limitless color and design options. In addition, polished concrete does not have grout lines like tile or vinyl composite tile (VCT) which can trap dirt and grime.

It is also more durable than other types of flooring, and withstands heavy foot traffic. A properly maintained polished concrete floor requires less extensive scrubbing and waxing, which cuts down on maintenance costs.

To further extend the life and beauty of a polished concrete floor, a densifier is applied during the grinding stage. The densifier sinks into the concrete and hardens it, eliminating the need for a topcoat that can be scratched or damaged over time. Once the floor is finished, a concrete sealer may be added. It is recommended that you have your concrete contractor apply the sealer with a sprayer, rather than a mop, so it’s evenly distributed.

Grinding

Using diamond grinding tools and a variety of grit levels, the floor is ground down to achieve an even surface. A handheld grinder is suitable for small jobs, but a walk-behind machine, such as the Onfloor 20 Pro, can handle large projects with ease. Work in a systematic pattern, overlapping your passes to ensure an even result. Start with a coarse grit pad to level uneven areas and remove high spots, then gradually work in finer grit pads until you reach your desired sheen.

It is important to note that the concrete must be fully refined before a sealer can be applied. This means working through each grit level, removing the previous scratch pattern with each pass and exposing new fresh material. Not performing full refinement will cause the surface to degrade prematurely.

A concrete densifier can be used after the polishing process to further increase the durability of the floor and provide a unique sheen. The chemical reacts with the ions in the concrete to create a strong, long-lasting bond.

Before applying the densifier, it is important to scan the floor for any cracks or hazards that need to be repaired. Cracks can be filled with concrete filler, and protruding pieces of metal can be chipped out. It is also crucial to check the moisture content of the concrete, as it will affect how quickly the densifier reacts and how much material will be removed during the process.

If the concrete is too dry, it will not accept the densifier and could lead to discoloration of the finished surface. For this reason, it is important to keep a constant check on the concrete’s moisture level throughout the entire grinding and polishing process.

Grind and seal is a cost-effective alternative to laying tiles or timber flooring, especially as it allows the concrete’s existing structure to remain intact. It is also a lot easier to maintain, as it requires less frequent cleaning than other floors and is resistant to stains.

The grind and seal process gives the concrete a smooth, matte finish that is perfect for those who are looking for a more rustic industrial look or want to hide any stains from previous spillages. This is an environmentally friendly option, as it only involves the use of water to capture dust particles and turn them into a liquid slurry.

Polishing

The concrete flooring industry continues to make waves in the commercial and residential markets. As a sustainable alternative to carpets and tile, polished concrete is gaining popularity due to its affordability, durability, versatility, and aesthetic appeal. It also eliminates the need for costly, harmful adhesives and coatings. The polished concrete process involves mechanically grinding and honing the existing floor surface with bonded abrasives to achieve a desired sheen or gloss level.

Before the concrete polishing process begins, it’s crucial to prep the concrete. Cleaning the concrete surface and removing any contaminants is a must, followed by patching and then hardening with a concrete densifier. A concrete sealant is also recommended to protect the finish from water and dirt infiltration and promote longevity.

Prior to starting the polishing process, you must decide on what sheen level you want your floors to achieve. The choice will influence the type of diamond grit you begin with and will also determine how long the polishing process will take.

A level 1 ground polish can be achieved by grinding the concrete with a metal bond diamond ranging in grit from 40 to 100. A level 2 honed polish can be achieved by grinding the concrete with resin bond diamonds in the 200 – 400 grit range. At this grit level, the concrete will have a low sheen and will start to reflect light from side and overhead lighting.

As the grit ranges increase, the concrete will become increasingly smooth with more and more sheen and clarity. Once you reach a level 3 polish, the concrete will have a very high sheen and at a distance of 30 to 50 feet, it will start to reflect side and overhead lighting.

Many people are concerned that polished concrete will be slippery, but the truth is that if the concrete is properly maintained and not exposed to moisture, it will not be any more slippery than plain, unpolished concrete or even waxed linoleum. There are however, specific concrete polishing guidelines and specifications that the concrete contractor and design engineer should work together to incorporate into the project before pouring to ensure a safe and durable outcome.

Sealing

Concrete is strong, durable, and aesthetically appealing, fitting into many interior design schemes. But it’s not indestructible and will eventually degrade under certain conditions, especially if exposed to heavy traffic or other abuse. Concrete floors need to be protected from abrasion, chemical damage, and moisture. The best way to do this is with a high-quality sealer.

Depending on the environment, there are different types of sealers available for concrete floors. For instance, a penetrating sealer will fill in the pores of the concrete to protect it from oil spills and changes in weather. However, this type of sealer may change the color of the floor and make it slippery when wet. On the other hand, a topical sealer will not alter the color of the concrete and provide a glossy finish.

A final step in the polishing process is applying a chemical hardener to the surface of the concrete to make it more resistant to wear and tear. This is particularly important in areas where heavy machinery, wheeled carts, or vehicles are in frequent use. If chlorides from deicing salts or other chemicals seep into the concrete, they can corrode the steel rebar and cause cracking. The addition of a hardener will prevent this from happening.

Keeping polished concrete floors clean is crucial to maintaining their luster and longevity. Establishing a cleaning schedule of daily dust mopping and weekly wet mopping will help to keep abrasive particles from scratching the surface. A pH-neutral cleaner will also help to remove dirt buildup without damaging the concrete sealant. It’s also a good idea to encourage people to wipe their shoes on a mat at the entrance of the building and to use felt pads under furniture legs. Using harsh chemicals that are high in acidity or alkalinity will dull the shine of the concrete surface as well, so stick to cleaners formulated for polished concrete. And remember to wring mop heads well before reusing them.

HVAC Contractors Explain What They Do and Why They’re Important

HVAC Round Rock systems are one of the largest energy consumers and comfort providers in homes. Yet they remain a mystery to many homeowners.

HVAC

Understanding the basics of hvac can help you choose the right system for your home. Learn about cost, key terms, products, basic maintenance schedules and more.

Whether you need to repair or replace your home’s heating system, HVAC contractors offer a variety of services that will make your home or commercial building more comfortable while reducing energy costs. Heating and cooling systems use a combination of fans, filters, and ducts to regulate temperature and airflow throughout the building.

The most common types of HVAC systems are furnaces, heat pumps, and ductless heating. Furnaces use gas to create warm air, which is then circulated through the ductwork. Heat pumps use electricity to transfer heat between spaces, making them more efficient than traditional furnaces. Ductless heating systems eliminate the need for a centralized ductwork system and are more environmentally friendly than traditional heaters.

HVAC systems are a vital part of modern buildings, as they create stable indoor climates to support human comfort and the functionality of sensitive IT hardware. They also help to reduce the risk of mold and other harmful pathogens in indoor spaces.

Some of the most important aspects of an HVAC system include its energy efficiency, air quality, and longevity. Regardless of the type of system installed, regular maintenance service can extend the life of the unit and prevent breakdowns.

HVAC related organizations provide a number of resources to their members, including online courses, seminars, webinars, and apprenticeships. These tools are designed to facilitate networking and learning, while promoting professional growth. They also support a safe working environment by providing safety and compliance advice.

In addition to their educational and professional development offerings, HVAC organizations also play a key role in setting industry standards and best practices. They often conduct research to find new technologies, materials, and methods that could improve the efficiency and sustainability of HVAC systems.

The HVAC industry offers a variety of membership options, allowing professionals to choose the level of engagement that best suits their needs and budget. Typical types of membership include annual, semi-annual, and lifetime subscriptions. This diversity in pricing reflects the industry’s commitment to inclusivity, and it ensures that everyone has an opportunity to engage with the organization’s offerings. Getting involved with an HVAC organization can be as simple as researching suitable options, applying for membership, and participating in discussions and educational opportunities.

Cooling

The cooling component of HVAC is responsible for regulating temperatures and dehumidifying air. It involves a combination of ventilation, which ensures air circulation and removes stale air; and air conditioning, which cools indoor air and circulates it through ductwork to different home areas. It also includes a thermostat, which acts as the control center of the system, allowing you to set desired temperatures and program fan speeds for optimal energy efficiency.

Ventilation involves your air return, filter, ducts and blower assembly, which provide mechanical ventilation that reduces humidity, odors and contaminants and maintains healthy indoor air. It also ensures that stale or contaminated indoor air is replaced with fresh outdoor air, which is critical for thermal comfort. The air circulating through your vents is pulled into the HVAC equipment by the fan, which then cools the air before it is pushed back out into living spaces.

A clogged drain can prevent moisture from leaving your system, which could cause damage to components like the air handler or air ducts. Air filters can also become clogged with dirt and debris, which can lead to poor performance or even total failure of the entire HVAC system.

If your system is based on a traditional split system, it will include an air conditioner positioned outside the property, an air handler and fans inside the property and ductwork to carry the cooled air to different rooms. Alternatively, there are also ductless systems that don’t require the use of air ducts and are capable of managing the temperature in individual rooms of a building.

Another type of HVAC system is the heat pump, which combines heating and cooling mechanisms into one unit. It is usually positioned outdoors, where it contains the refrigerant that will later be used to cool indoor air. A heat pump is very energy efficient and has the added benefit of providing radiant heating during colder weather. It is also possible to purchase a packaged HVAC system, which combines an AC and furnace into a single unit. This is an ideal option when a property doesn’t have the space to install a ductless system.

Ventilation

Ventilation refers to the process of exchanging indoor air with outdoor air, removing stale air and extra moisture from inside a building. This helps maintain a healthy environment with high indoor air quality, and it is crucial to the comfort of occupants.

The ventilation system in a HVAC system is comprised of air filters, air intakes and exhausts, ductwork, and blower assemblies, among other components. When your HVAC technician performs maintenance, they will make sure these components are clean and free of debris, dirt, mildew, or any other harmful contaminants. They may also clean the ductwork, as well as disinfect or deodorize it to reduce odors caused by bacteria and mold.

Your HVAC unit works on a simple concept: it pulls in outdoor air, circulates it throughout your home or office, and then pumps the fresh, cooled air back out through your vents. This helps keep your indoor air quality pristine by getting rid of stale air and excess moisture while drawing in the outside air to help regulate humidity.

When the conditioned air is pumped out through your vents, it goes into your home or office air ducts where it gets distributed to all rooms and offices in your building. Air in your ducts is blown past an air conditioning coil, which cools it by absorbing heat from the warm air. This cooling action draws in water vapor from the air, which is then released outdoors as condensate.

Often, a combination of natural and mechanical ventilation is used in buildings, with doors and windows opened to allow for natural air exchange, while mechanical systems are used to transport the air. In more tightly-sealed homes or office buildings, this is an especially important consideration, and the HVAC system can be equipped to ensure that proper ventilation rates are met.

As an energy efficiency company, we are committed to helping our customers maximize the efficiency of their HVAC system and optimize its performance. We offer a range of services, including auditing and identifying areas for improvement, installing new insulation, sealing leaks, replacing your air filter, and more. By making these and other improvements, we can help you save on your energy costs while improving the health, productivity, and learning in your space.

Maintenance

A commercial HVAC system that is well maintained will use less energy to operate. This translates to lower utility bills, which saves money on energy costs and helps the environment by reducing carbon emissions. The system will also last longer because fewer issues are spotted and repaired when maintenance is performed regularly.

When an HVAC system is not properly maintained, it can experience unexpected breakdowns and costly emergency repairs. These issues can halt production in a factory or stop an office from turning a profit. This is especially true for larger properties with multiple units, which can be extremely expensive to repair when the problem arises.

HVAC maintenance services include replacement of air filters and checking the thermostat to make sure it is accurate and functioning correctly. It also includes inspection of electrical connections and components to identify loose wires, faulty capacitors or other problems that can lead to system malfunctions. These issues are then corrected before they cause serious issues like fires or equipment failure.

Humidity control is another service provided by HVAC maintenance, which helps prevent the growth of mold, mildew and bacteria. It can also help improve indoor air quality and comfort, as well as reduce the frequency of respiratory illnesses like asthma and allergies.

Ventilation services are another part of the maintenance offered by HVAC, which can clean supply and return vents and inspect ductwork for leaks, damage or poor joints. In addition, the technician will examine and replace filters, clean critical components like fans and blowers and evaporator coils and check for refrigerant levels to ensure optimal performance.

Performing these maintenance services will keep the HVAC system working as it should for as long as possible, which means fewer repair calls and higher customer satisfaction for property management companies. It will also help them get better rates from suppliers because they can provide a more consistent level of work. This is important because if there are too many issues with the system then it will have to be replaced sooner, which will cost more than if it had been properly maintained.

Choosing the Right Foundation Repair Contractor

Whether you need to address minor hairline cracks or a significant fissure, choosing the right contractor can make all the difference. Look for contractors with local knowledge of soil conditions and building codes.

Watch out for signs of foundation damage such as sloping floors and sticking doors. Addressing these issues promptly can help prevent future damage and costly repairs. Visit https://www.apexplanofoundationrepair.com/ to learn more.

Foundation Repair

Structural damage to a home’s foundation isn’t something homeowners can ignore. While it may seem like a minor inconvenience at first, cracks in walls or doors that stick are often early warning signs of serious problems – such as foundation shifts and sinking. Addressing these issues promptly is essential to preserving the integrity of the building’s structure and saving money on escalating repair costs.

While quick fixes such as patching or leveling might mask structural damage, these only offer short-term solutions. The underlying causes of these problems are frequently related to unstable soil, caused by factors such as heavy rain or poor landscaping. These shifting soils can leave gaps beneath a foundation, causing uneven support and eventual structural damage to the building.

In order to properly diagnose and repair structural damage, qualified foundation professionals need to inspect the building’s interior and exterior. In addition to identifying and addressing visible cracks, these experts can check the building’s crawlspace for sagging beams that need to be shimmied or replaced. They can also perform a soil test to determine the stability of the ground underneath a house.

Depending on the extent of the damage, it may be necessary to dig and remove part or all of a home’s foundation. This process is often time-consuming and expensive, and it can result in damage to trees, shrubs, walkways, driveways, and other landscaping around the house.

Once the excavation is complete, the repair work can begin. Techniques such as piering and slab jacking correct the instability of a foundation, preventing soil movement and building sinking. These methods can take a few weeks to complete, and they might produce some noise or vibrations. In some cases, it might be necessary to temporarily vacate a home while the repairs are being performed.

After the repair works are completed, homeowners can return to their home. It is normal to see some small cracks re-appear as the house settles, but these can be easily repaired using caulk or putty. Choosing an experienced and reliable foundation repair contractor is the best way to ensure that your home’s foundation remains safe and stable for years to come.

Leaks

Leaks can cause serious problems, from compromising your home’s structural integrity to flooding your basement and damaging your possessions. Water leaks also cause musty odors and can attract mold and pests. If you’ve noticed puddles or standing water in your basement, it’s time to call for foundation repair services.

Often, these leaks are caused by plumbing. As water leaks from pipes and seeps into cracks in your concrete foundation, it can create pressure against the walls and cause them to shift or bow. The pressure can also cause the cracks to widen over time. If you notice these symptoms, it’s important to address the issue quickly to avoid further damage.

The best way to prevent leaks is to make sure your gutters are clean of debris, and that they direct water away from your foundation. You can also install a french drain or other system to divert groundwater and surface water away from your foundation.

If you have a leaky basement, it’s important to have it repaired as soon as possible to avoid more extensive damage and costly repairs. A professional foundation repair contractor will be able to find the source of the leak and seal it so that you can enjoy a dry, comfortable home.

For leaks that occur in wall cracks, epoxy injection is a great option. This is a trenchless method that uses an epoxy or polyurethane foam to fill and seal the crack, keeping water and moisture out of your home. This method is best for small, shallow cracks that haven’t caused major shifts in the foundation.

Other methods include pipe rerouting or re-piping, which involves installing new plumbing lines that bypass the damaged section. This is a good option when the damaged section is a short section of pipe or when the plumbing is encased in concrete and cannot be easily accessed without damaging the slab.

For severe leaks, a full excavation and piering process may be needed. The excavation process can take several days and involve drilling through the foundation, jacking the house up on steel piers, then pumping mud under the foundation to lift it back onto its cured piers. Once the excavation and piering are complete, the home will be secured with steel shims and concrete blocks.

Uneven Floors

When construction contractors lay the foundation for a home or building, they typically compact the soil beneath it. This is intended to help prevent the foundation from shifting over time. However, sometimes the soil becomes too loose or weakened by water damage for the structure to maintain its proper position. This can result in uneven floors.

Uneven floors are a sign that there is a serious problem with your foundation. It is essential to call a professional as soon as you notice them, so that they can determine the cause and recommend the best repair solution for your needs.

Sagging or sloping floors are the most common signs of a foundation issue. These problems can range from a damaged crawl space to foundation settlement or subfloor problems. While you may be tempted to fix these issues with self-leveling concrete, this is only a temporary solution. Instead, a foundation specialist can recommend one of many enduring solutions, such as foam jacking, slab leveling, helical or push piers, or underpinning.

Another common cause of uneven floors is structural wear and tear. This can cause the floor joists to weaken and sag over time. This is especially common in homes with crawl spaces that aren’t properly encapsulated. In these cases, excess moisture accumulates and can weaken wooden floor joists and subflooring. The best way to prevent this is by investing in a quality crawl space encapsulation system, which includes a vapor barrier and venting.

Foundation settlement is another leading cause of uneven floors. This occurs when the soil underneath a home shifts and sinks, causing the foundation to move down or up by several inches. This is most common in clay-based soils, which are found throughout Ohio and Northern Kentucky. In addition to a good soil drainage system, other ways to address this issue include adding a slanting swale or regrading the soil around your foundation.

Mold

Mold growth can be caused by many problems, including foundation cracking and settling. But it can also occur when the soil underneath a foundation shifts, creating hydrostatic pressure that pushes water toward the house. This moisture is a breeding ground for fungi and mold that can affect the health of anyone who lives in a home or office with such a problem.

Mold can be found in any area where there is excess moisture. This includes areas behind and inside walls (where leaking or condensation forms), inside cabinetry where water spills or condensation gathers, in ceiling materials above rooms with a leaky roof, in ductwork and more. Mold spores are floating around indoors all the time, and people don’t usually get sick from them because their concentration is low. But if mold spores land on a wet surface and get stuck, they will begin to grow and release their own spores that can cause mold sickness in people living nearby.

If you suspect that you have a mold problem, don’t try to handle it on your own. Mold is dangerous and can be toxic, so you should leave it to professional mold remediation experts. These experts will safely and thoroughly remove any affected materials and then clean and disinfect the surfaces they removed. They will also test the air to ensure that the spore count is down to safe levels before you return to the area.

Cracking and settling in a foundation can affect doors and windows, making them harder to open and close. It can also lead to floor issues, including warping and unevenness. Poor exterior drainage, shifting soil and flooding of crawl spaces are some of the causes of these problems.

These problems can be prevented by having a professional waterproofing service install a barrier to prevent water from seeping into the basement. You should also ensure that the yard grade slopes away from your home’s foundation and that downspouts are unobstructed and flowing properly. Cleaning and disinfecting any water leaks promptly and drying wet areas and materials within 24-48 hours will help prevent mold growth. Adding fans and keeping humidity levels below 60% will further help.

Choosing the Right Type of Plumbing for Your Home

Plumbing is the network of pipes and fixtures that deliver fresh water and remove wastewater. It’s a vital part of any home, and proper maintenance is essential to prevent leaks and other problems.

Plumbing

Understanding the basics of plumbing can help you make informed decisions about which materials are best for your home. Visit https://www.plumbing-express.com/ to learn more.

Copper is a natural metal found on Earth that is mined and then used by plumbers to make pipes for homes. It is a great choice for water pipe lines because it is durable and can last for decades with little to no maintenance. However, it is more expensive than other pipe materials like polyethylene and PVC. That is why some homeowners choose to replace their copper pipes with PVC when they do a repipe.

If you are looking for a plumber to replace your copper pipe lines, you should research their qualifications and experience before hiring them. A plumber that specializes in pipe replacement will have the tools and knowledge needed to complete the job quickly and efficiently. The plumber should also be able to offer suggestions on how to keep your home’s pipes in top shape for longer.

The International Plumbing Code is a set of rules and regulations that is used by plumbers to ensure that their work meets standards for safety and health. The code includes guidelines for all aspects of a plumbing system, including the piping that is used. It also covers how to install and repair plumbing fixtures.

A copper pipe line can withstand a lot of pressure without bursting. It is also resistant to corrosion and can withstand high temperatures. It is an excellent choice for hot and cold water plumbing systems. However, a plumber should use caution when installing copper plumbing in older homes. The old piping may be susceptible to galvanic corrosion, which can lead to the release of toxic lead into drinking water.

There are many different types of copper pipes, and each one has its own characteristics. For example, Type K and L copper pipes are thicker than Type M copper pipe. Type K and L pipes are commonly used in residential plumbing for water supply lines. Type M copper pipe is thinner than Type L pipes and is often used in drains, waste, and vents.

Copper is a very good conductor of electricity. It is used in many wires today, and it is more efficient than other metals. In addition to being a good conductor of electricity, copper is also durable and can last for decades without corroding. It is also affordable and easy to install, making it a popular choice for plumbers. Copper is a recyclable metal, so you should always recycle it when you are finished with it. You can find copper recycling centers in most cities and towns.

PolyB

Embrace the adage, “An ounce of prevention is worth a pound of cure.” Taking proactive steps to replace polybutylene pipes before they develop leaks and mold is a sound investment in your property. A comprehensive repiping solution prevents costly plumbing emergencies in your home and ensures that the vital water supply for your family is safe, clean, and fresh.

During the 1970s and 1990s, Poly B was widely used in homes across Canada. Unfortunately, this piping material is prone to failure, especially in areas that experience high temperatures, like hot water pipes or pipes that run through boilers and attics. The resulting cracks, holes, and leaking pipes can lead to costly repairs and extensive plastic water damage, but they also pose serious health risks. These frail pipes leach chemicals into the household drinking water, contributing to a variety of symptoms including headaches and gastrointestinal issues.

Poly B piping also fails to meet modern piping standards, leaving your home vulnerable to contamination from environmental factors and abrasions. Copper, on the other hand, meets these standards and offers superior durability that stands up against the rigours of everyday use.

Aside from enhancing the safety and quality of your water supply, replacing old polybutylene pipes improves your home’s energy efficiency, as these pipes are prone to condensation and heat loss. Using more efficient piping can save on your energy bills, and it can also help you save money on future maintenance expenses.

The first step in identifying the condition of your home’s polybutylene piping is to hire an experienced plumbing service that specializes in repiping. Skilled plumbers can identify the extent of the Poly B problem in your single detached homes, condos, and townhomes in Vancouver and Kelowna, and recommend an efficient repiping strategy that addresses all existing plumbing connections. This streamlined approach reduces installation and repair costs, ensuring that your new plumbing is fully functional and in compliance with building codes. The best part is that repiping with more reliable materials like copper or PEX can also increase your home’s resale value. So what are you waiting for?

Polyethylene

When you’re looking for a pipe line that will carry water, gas or other liquids, it’s important to choose the right type. There are a number of different pipe materials to consider, and each has its own unique set of properties. One popular option is polyethylene (PE).

PE pipes are manufactured from a thermoplastic created from the polymerization of ethylene. This versatile material is often used for water lines and underground utility lines because it’s strong, durable and affordable. It can also be easily recycled.

There are a few different types of PE pipe, including low-density PE and high-density PE (HDPE). Depending on the type you choose, it will be rated for a specific pressure, temperature or other environmental factors.

Low-density PE is commonly used for irrigation systems because it’s flexible and can withstand low pressure. HDPE is more rugged and can handle higher pressure, making it ideal for industrial and commercial piping projects. You can also find PE pipes in heating and cooling systems, as well as geothermal ground loops.

Another benefit of PE pipes is that they’re impermeable, which helps protect environmental water quality in drainage applications. They can also resist damage from rocks and debris in buried lines. PE pipes are also resistant to corrosion and unaffected by soil acidity or moisture. They can even withstand vibration, thermal cycling and extended sun exposure that degrades other plastics.

Polyethylene pipes are also incredibly easy to install. They’re lightweight and flexible, so they can snake around landscaping and contour to placement trenches. They’re also durable, able to withstand crushing and kinking caused by heavy equipment or unforeseen shifting of the earth beneath them. They’re also resistant to chemicals and can withstand freezing temperatures as well as conveying superheated liquids.

Like any piping system, your PE pipe lines will need to be properly insulated. This will help keep the pipes at a safe temperature, prevent surface condensation and provide safety for your personnel. You can use fiberglass or polyurethane insulation, but be sure to choose a material that is rated for the temperatures your pipe lines will encounter.

PVC

PVC pipes are some of the most popular plumbing materials available. They are affordable, durable, water-resistant, and require little maintenance. They are also environmentally friendly, as they use fewer resources to produce than traditional construction materials. This makes them ideal for new construction projects, as well as for replacing older materials in refurbishment projects.

Unlike copper, PVC is not prone to corrosion and can withstand high levels of pressure. This makes it an ideal material for use in a variety of applications, including drainage and sewage systems. PVC is also a safe option for piping drinking water, since it is non-toxic during production.

While there are many benefits to using PVC, there are some things to keep in mind before purchasing this type of piping. First, it is important to know that PVC is not suitable for hot water pipes. Heat and UV can degrade it over time, so it should not be used in outdoor plumbing or to pipe hot water. It is also not flexible, so it should not be used in tight spaces.

Another thing to keep in mind is that there are many types of PVC, and each one has its own unique set of advantages and disadvantages. For example, some types of PVC are not suitable for underground applications, while others are made from recycled materials. Therefore, it is important to research each type of pipe before making a purchase.

The most common type of PVC is uPVC, or unplasticized PVC. This type of piping is typically used for DWV (drainage, waste, and vent) systems in homes and commercial buildings. These pipes are designed to transport wastewater from the building to the city sewer system or an on-site septic tank.

CPVC is an alternative to uPVC for residential and commercial plumbing. This type of piping is manufactured from chlorinated polyvinyl chloride and is designed to handle higher temperatures than other types of PVC. CPVC is commonly used in industrial, chemical, and food and beverage applications. It is also used in fire sprinkler systems and swimming pool plumbing because it is resistant to chlorinated water and high temperatures.

How to Choose Roofing Companies

There are several factors to consider when choosing Roofing Companies Murfreesboro TN. These include the roofing contractors’ qualifications, their work process, and their communication practices.

Roofing

Roofing general contractors have established relationships with suppliers and manufacturers. This allows them to access quality materials at competitive prices. These savings are often passed on to the client.

When choosing a roofing contractor, it is important to consider their experience. A good roofer will have a strong portfolio and proof of completed work. A great company will also be able to explain their estimates and work with you to find solutions that fit your budget. A roofing company with poor customer service should be avoided.

A roofing contractor is licensed to install, repair, extend, and design all kinds of commercial and residential roofs, as well as other related services. They have the experience, knowledge, and skill to provide the best possible service for their clients. They also have the necessary tools and equipment for completing roofing jobs, such as ladders, sponge pads, special footwear, and ropes. Having these resources will allow them to do the job safely and quickly, saving their clients time and money.

Another important factor to consider when choosing a roofing contractor is their reputation. Checking online reviews and ratings can provide valuable insights into the contractor’s professionalism, work ethic, and customer satisfaction. Also, look for detailed testimonials that reveal how the contractor handled challenges during the project.

Lastly, you should make sure that the roofing company is insured. This will protect you in the event of any injuries or damages caused by a contractor’s employees. A good roofing contractor will have insurance that covers workers’ compensation, property damage, and liability for personal injury.

A good roofing contractor will be able to provide a comprehensive breakdown of the costs associated with the roofing project, including materials and labor. They will also be transparent about any additional charges, such as permitting or cleanup fees. They will also be able to explain manufacturer and workmanship warranties in detail.

Finally, you should be able to find a roofing company with a clear contract that outlines all aspects of the project, including timelines and warranties. A quality contractor will always prioritize transparency and honesty in their business practices. Moreover, they will prioritize safety by providing their workers with the right equipment and following industry guidelines. They will also be able to provide their customers with warranty coverage and routine maintenance checks.

Licenses

A licensed roofer is a professional who has taken the time to study, take exams, and demonstrate their knowledge of the industry. They are required to carry insurance that will cover you, their employees, and your property in case of any accidents or damage. Additionally, a professional roofer will be familiar with local building codes and regulations, ensuring that your project is up to standard.

A license is your best guarantee that a contractor will provide high-quality work and will be accountable for their actions. Typically, licensing is done at the state or local level and requires you to verify that the roofer is licensed before hiring them for your project. Depending on your location, you may also need to check for any disciplinary action or complaints against the contractor.

Hiring an unlicensed roofer can lead to legal issues and problems with insurance claims. In addition, unlicensed contractors often charge less and can be difficult to contact after the job is finished. If something goes wrong with a roofing project performed by an unlicensed contractor, there are few consumer protection resources available.

Licensed roofing contractors have a reputation to uphold, so they will do everything they can to maintain a good name and high customer satisfaction. They are also required to abide by the strict standards set forth by their licensing body. This means that you can trust them to do high-quality work and provide excellent customer service.

You can usually check a roofer’s licensing online. You will want to make sure that their license is active and in good standing, as well as check for any specialties or limitations. You will also want to look for a bond, which is an amount that a contractor must post as security in case of a complaint or disciplinary action.

A licensed roofer will have a wealth of experience and will be up to date on the latest techniques and materials. They will be able to answer any questions you have about your roofing needs and provide a thorough estimate for the job. Choosing a licensed roofer will ensure that your project is completed up to code and that you are getting the best possible price for your money.

Insurance

When choosing a roofing company, it’s crucial that you consider whether they have the appropriate insurance coverage. Licensed, bonded, and insured roofers are more likely to have a strong reputation, excellent customer service, and the experience to handle any type of roofing issue. Moreover, insurance policies offer significant protection in case of damage or injury, so it’s worth investing in a premium that meets your specific needs.

Most homeowner’s insurance policies cover a wide range of damages that may impact the condition of your roof, such as damage from hail, fire, or wind. You can also opt for dwelling coverage, which provides protection against losses that may occur during the course of construction. If you opt for this option, it’s important to review your policy annually to ensure that it still meets your current insurance needs and that you have the correct amount of coverage.

Commercial umbrella insurance is another essential policy for roofing contractors, as it adds additional liability coverage to your existing policies. As a result, this can save you from paying out-of-pocket expenses in the event of a lawsuit. For example, a third-party bodily injury claim could cost your business thousands of dollars in legal fees, settlements, and more. Alternatively, a pollution liability policy can pay for cleanup costs when your roofing operations cause pollution in the environment, such as contaminated soil or water.

Workers’ compensation is a mandatory policy in New York for businesses with employees. It covers medical expenses and lost wages for injured employees, and is generally based on payroll size and claims history. However, it’s important to note that it does not usually cover injuries related to intoxication or horseplay, and independent contractors are generally excluded from coverage.

Tools and equipment are expensive, so it’s essential for roofing companies to have adequate business property insurance. This policy protects your tools, materials, and other assets from theft, damage, or loss, and can be purchased for a small annual premium. Moreover, if you frequently transport your property between jobs, then you might want to invest in inland marine insurance, which is designed for items that are in transit or stored offsite.

Warranty

A roofing system consists of an array of elements working together to protect your home. When any one of these components fails, it can lead to costly repairs or even a full roof replacement. The right warranty offers a safeguard against these unforeseen expenses, protecting you and your property from the financial burdens of repair or replacement for a period of time. When selecting a roofing contractor, look for a company that offers both material and workmanship warranties. This ensures that any problems with the material or installation will be covered for a period of years.

Most roofing manufacturers offer a standard product warranty that covers manufacturing defects for a specified length of time. However, this warranty does not cover labor costs or other necessary expenses. Moreover, the manufacturer typically requires a qualified professional to perform installation and complete an inspection or series of inspections. A comprehensive workmanship warranty, on the other hand, provides compensation for any damage caused by improper installation or faulty building techniques.

Roofing warranties and guarantees vary widely in terms of coverage and duration. Some are prorated, meaning that their coverage decreases over time while others are non-prorated and provide full coverage for the entire warranty period. Some also allow homeowners to transfer the warranty to a new owner if they sell their home during the warranty period, which can be an attractive selling point.

The length of a roof warranty can have a major impact on its value. While a five-year warranty may seem reasonable for basic asphalt shingles, the long lifespan of premium materials like metal or clay tile warrants a much longer coverage period. In addition, some warranty providers offer extended warranties that go beyond basic material and workmanship guarantees, providing valuable peace of mind protection to homeowners and boosting their property value.

The most reliable roofing warranties are comprehensive and offer extended coverage periods. They also require the homeowner to comply with certain conditions, such as working only with approved contractors and adhering to set roofing specifications. These conditions make them more dependable than traditional roofing warranties, which can leave homeowners vulnerable to unexpected roofing mishaps.

How Basement Remodeling Can Transform a Neglected Space into an Essential Part of Your Home

Basement Remodeling Princeton can transform a neglected space into an essential part of your home, adding both comfort and value. Turn yours into a guest suite, an entertainment center or a high-end hangout.

Basement Remodeling

Before beginning any remodeling, thoroughly inspect the area for issues that may require remediation. Moisture is a common problem, which can cause mold and structural damage if not addressed properly.

Adding an extra living space to your home can increase your property value and make it more appealing for future buyers should you decide to sell. Adding bedrooms and bathrooms is one of the most popular basement remodels, but there are many other ways to transform your space. For example, a media room with a big screen TV and surround sound system can be a fun family hangout, while a workout room or home office is a great place to get work done.

The basement’s natural soundproofing and higher-than-usual windows can also make it an ideal location for a home theater or studio. You can also create a cozy social gathering room where friends and family can enjoy board games, foosball, pool, and video games. Another popular option is to add a kitchen for easy access to food and drink, which makes the perfect spot for casual family meals.

A basement can even become a full apartment, perfect for accommodating guests or multiple families in one home. With the addition of drywall, insulation, and egress windows, you can have a fully functional living area with its own entrance from the outside. This is especially appealing to younger people who are looking for an apartment lifestyle without the maintenance of a traditional house or condo.

A basement can also be a great location for an in-law suite, making it easier to take care of elderly parents or other loved ones who are moving in with you. However, before considering this option, it’s important to consider how well your parents will fit into the basement and what their needs might be. Also, be sure to factor in the cost of any renovations and any additional expenses such as heating or cooling costs. These can be significant for a large space, and if they aren’t planned in advance, can quickly derail your project. Be sure to set a realistic budget and timeline, and consult with experts when needed. This will help keep your project on track and ensure that you end up with a finished basement that will provide years of enjoyment for you and your family.

Adding Bedrooms

A basement bedroom adds a new dimension to your home’s living space. It provides a private retreat for guests or family members, far away from the noise and chaos of the rest of the house. This can be a wonderful option for college-aged children who may not want to return to their childhood bedrooms or for homeowners hosting long-term houseguests.

Adding a bedroom to your basement isn’t as complicated as it sounds, though you will need to consider the room’s size and location in relation to other rooms in the house. You also need to ensure that the bedroom meets safety standards, such as having an emergency exit (typically a window). A basement bedroom usually requires an egress window that is at least 4 feet wide and can be opened from inside the basement. You will need to take into account the cost of a window, as well as any other construction or structural work necessary to make the space safe for sleeping.

One of the advantages of a basement bedroom is that you don’t have to worry about matching it with the design scheme of other areas of the home, and can instead use the space as a canvas for your own creative vision. This opens up a whole new realm of possibilities, from a cozy guest suite to a kids’ playroom or sleek office.

As with other basement remodeling projects, it is important to research your options and find a contractor you trust before starting the work. A reputable contractor should be able to provide you with references and a portfolio of past basement remodels. It is also a good idea to get multiple estimates before committing to a project.

Once you have your basement bedroom completed, you’ll be able to enjoy the privacy it offers while your guests stay and increase the value of your home if you decide to sell in the future. A bedroom in the basement is a great selling point for buyers, who prioritize usable space and are willing to pay for it. It’s much more appealing to potential buyers than a leather-clad man cave or multi-purpose catch-all.

Adding Bathrooms

Basement bathrooms are an important addition to a home. They eliminate trips up and down the stairs for kids and guests, and increase resale value. Basement bathroom remodeling is also a great opportunity to add luxurious touches. From mirrors to vanity cabinets, there is plenty of room for creativity and personalization.

Before you begin a basement bathroom remodel, it is vital to understand the layout and plumbing requirements for your space. Make sure you know where your sewer line is located and that it will be able to handle the additional plumbing fixtures. You should also be aware of the minimum ceiling height required for a basement bathroom. This will affect how your space is designed and may require ductwork to be moved or raised in order to meet building codes.

To reduce costs and time during a basement remodel, consider working with existing plumbing and electrical systems. This will be less expensive and will allow you to avoid costly relocations of piping. If possible, position your new bathroom close to the main line, as this will make it easier and more cost effective to connect your new fixtures. It is also important to take into account the size of your basement, and whether you want a full bathroom with a tub or shower, or just a cloakroom with a toilet and sink.

Once your basement bathroom is complete, you can enjoy it and use it as needed. Adding a bathroom to your basement is a great way to increase the function and value of your home, and it can be a relaxing retreat for you and your family.

If you are considering turning your basement into an additional living space, it is crucial to hire professionals who specialize in basement remodeling. They will be able to help you determine the best options for your space and make it look its best. They can also provide the necessary building permits and conduct the inspections needed to ensure that your renovation meets all local and state codes. They can also assist with design and color choices, ensuring that your basement will be a beautiful, functional addition to your home.

Adding Storage

A basement can be a multifunctional space that accommodates the needs of your family for years to come. It’s also a great place to store all of your belongings, from seasonal decorations and linens to sports equipment and crafts. A cleverly designed basement storage solution can help keep your household running smoothly and eliminate clutter.

A good way to organize your basement is by installing a wall-to-wall shelving unit. This storage solution allows you to customize the shelves based on your needs and blends nicely with the walls for a seamless look. This is also a smart choice if you have an oddly shaped area that off-the-shelf storage won’t work in.

Another smart option for basement storage is to install cubbies beneath a built-in bench. This allows you to tuck away shoes and bags, keeping them off the floor and organized. You can even include hooks for coats and backpacks to save more space. This simple design works well in any finished basement and is a cost-effective way to add plenty of storage.

You can also create a home bar in your basement by installing a console and arranging it with a few bottles of your favorite spirits and decorative items to greet guests as they enter the space. You can also display stacks of books and travel souvenirs on floating shelves for a functional, yet visually appealing basement entertainment space.

If you have a laundry room in your basement, make sure to incorporate plenty of storage solutions for laundry supplies and extra cleaning products. This will prevent them from taking up valuable floor space and can help keep your laundry room looking neat and tidy.

While a finished basement isn’t typically used as a primary living space, it can be a fantastic place to create a media room, office, or craft zone. With the right basement remodeling, it’s possible to transform these spaces into a comfortable and inviting hangout for your entire family. A little planning can also help ensure that your home’s essential mechanicals like the furnace and hot water tank are conveniently located in the basement where they’re easy to access for maintenance.

Navigation