Small dents and scratches in drywall are usually easy to repair with a spackle or a lightweight joint compound. Then, you can sand the area smooth and repaint it.
Occasionally, holes in drywall can be more extensive. Patch kits can work for small holes like those caused by doorknobs, but any bigger hole requires mesh drywall tape and more expertise. Contact Drywall Repair Phoenix now!
Small holes caused by screws and hooks, doorknobs, or a spontaneous game of football can be repaired quickly using spackle and a few other simple tools. If you have a larger hole in your drywall, you’ll need to install a patch and a small amount of mud, but this can be done relatively easily.
First, measure the size of your hole and mark it with a pencil or crayon. Then, use a utility knife to cut around the hole. This will give you a clean surface to work with and prevent extra damage as you go along. Make sure you avoid cutting any electrical wiring, which may be near the hole.
Once you’ve cut away the hole, you can begin patching. Depending on the size of your hole, you’ll need to purchase a drywall patch kit. This will include a piece of drywall that’s slightly bigger than the hole, and tape, which you’ll need to apply first. You’ll also need to add wood furring strips, which are pieces of lumber cut to the same length as the drywall. These are used to support the new drywall and keep it from touching the existing wall.
You’ll also need a tool to cut the pieces of drywall that you’ll be installing. This will be a circular saw, and it’ll need to be sharp so that you can cut the drywall neatly and cleanly. You’ll need to add a few inches of wood furring to either side of the hole, which will help keep the new drywall from touching the old wall.
The next step is to sand the edges of your patch to smooth them and make them blend in with the rest of the wall. Once the patch is sanded, you can begin to paint it.
When you’re ready to paint, be sure to let the mud or spackle dry completely. Depending on the product, this could take a few hours or longer.
If you’re doing a large area of repair, you should also consider repainting the entire wall to ensure the patch looks seamless. After all, nobody wants to see a patch in the middle of a wall!
Repairing a hole
Drywall repair is a project that most homeowners will tackle at some point. It can range from nail pops and small holes caused by doorknobs to cracks and other damage caused by moisture or settling foundation. Fortunately, many drywall repair problems are relatively easy to fix. Silva offers a simple, straightforward method for addressing these issues.
The first step is to identify the type of problem and determine the best method for repairing it. This assessment is important for do-it-yourselfers, as it will determine how much work the job requires and what materials are needed. In some cases, it may also help identify any underlying causes of the problem. For example, small holes from doorknobs might indicate that the home is settling slightly, while larger cracks could signal structural problems.
To repair a hole, start by cleaning the area around the damaged drywall. This includes removing loose paper and gypsum. Next, cut away any protruding drywall. This can be done with a utility knife, but it’s best to use a blade with a long handle so you can reach the edges of the wall without disturbing the wires and plumbing. It’s also a good idea to turn off the electricity before starting any cutting.
After cleaning the area, apply a drywall patch that is slightly larger than the hole. Then, spread a layer of joint compound over the patch and sand it to smooth the surface. Then, apply a second coat of compound and sand again. Once the second coat dries, you can paint the patched area to match the surrounding wall.
Before applying the final coat of drywall compound, it’s a good idea to lightly sand the patched area again with fine grit sandpaper. This will remove any remaining bumps and make the finished wall look more even.
Another option is to use a pre-mixed joint compound for smaller holes. This can be purchased at most hardware stores or online. It is available in a number of colors and can be applied to either textured or smooth walls. However, if you’re using this method, be sure to follow the instructions carefully because it can shrink as it dries.
Repairing a crack
If your home has a crack in the wall, it’s important to take the time to evaluate the problem. Depending on the size and extent of the crack, there may be an underlying issue that needs to be addressed before you can make a permanent repair. Small holes and cracks can usually be patched and touched up with a coat of paint. Larger holes and cracks require a more extensive drywall repair.
Most drywall cracks appear around the seams where two sheets of drywall meet. Although drywall is constructed of large panels held together with drywall mud and tape, these seams still flex as the house settles and move from side to side. This stress can cause a hairline crack to appear near windows, doors, or entryways. While these cracks are not necessarily a sign of structural problems, they do indicate that the framing or foundation is under stress.
To repair a crack, apply a thin coat of joint compound with a drywall knife to the area where the crack is located. Wait for the compound to dry, then sand it lightly with a sanding sponge. Apply a second coat of compound and sand again for a smooth finish. Multiple thin layers of compound prevent excessive shrinkage and minimize the amount of sanding required.
You can also use a drywall patch kit for small holes in drywall. These kits are designed to fix holes about the size of a doorknob. They typically have a reinforced center panel surrounded by self-sticking tape that adheres to the wall. They are quick and easy to install, but they do not provide a seamless repair.
For cracks in drywall that are more than a few inches wide, you’ll need to cut a v-shaped notch into the wall on both sides of the crack. This will help reduce the amount of force that is transferred to the surrounding drywall and prevent the crack from widening over time.
If the crack is at a stud, countersink it by driving a screw into the stud through the drywall and into the wood backing of the stud. This will pull the drywall and wood backing together, reducing the likelihood of further cracking.
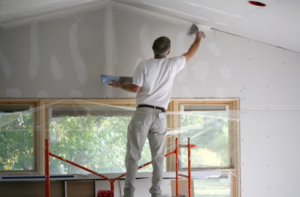
Repainting
Drywall repair is a project that most homeowners face at some point, from nail pops and small holes to larger cracks caused by settling foundations. While these problems may seem minor, repairing them correctly can save you money in the long run by avoiding further damage to your home. To complete this job, you will need several tools and techniques. To paint drywall, you will need the right type of primer and a high-quality brush or roller. You will also need drop cloths to protect your furniture and floor from drips and splatters.
Small dents, like those caused by doorknobs or furniture, can be repaired using a spackle and putty knife. Start by cleaning the damaged area, removing any loose drywall or dust. Make sure that any holes left by nails or screws are filled with spackling and smoothed out with a putty knife. When the spackling dries, apply a second coat and sand it to smooth out any rough spots. Before painting, you should always apply a light, even coat of primer to the entire surface to help the new paint adhere to the drywall.
To patch larger holes, you will need a piece of scrap drywall, furring strips, joint compound, and a hand-held drywall knife. Start by bedding in the tape along the edges of the hole, then cover with joint compound and sand it lightly. After applying a second coat, sand and feather the edges to blend in the new repair. You should wear a mask when sanding the joint compound to avoid inhaling any dust.
For smaller cracks, you can use a drywall knife to apply a skim coat of compound to the affected area. This step is necessary to prevent the crack from widening or flaking later on. After the first coat dries, you can use a hand-held drywall knife to apply another skim coat and sand it again. Repeat the process until the area is completely smooth and ready for painting.
Repainting your drywall can be a challenge, but with some tips and tricks, you can make it look professional. Before you begin, you should remove any items from the wall that will be painted, such as smoke detectors and outlet covers. You should also take down any drapes or blinds that are in the way of your painting project. Finally, you should cover any items that you cannot remove with a sheet of blue painter’s tape.